Simples... Feliz.....
Quero dividir com voces tudo o que encontro, crio e... que faz bem aos olhos, a alma e traz felicidade...
segunda-feira, 28 de julho de 2014
Jogo de Mesa bem economico.....
Belo projeto e economico encontrado no blog da RoAguiar.... Vale a pena visitar.....
http://ro-aguiar.blogspot.com.br/2012/05/mesa-bem-vestida-economia-e-bom-gosto.html

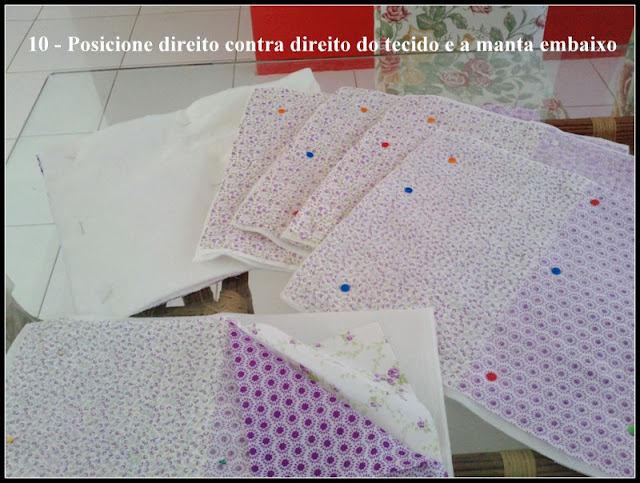
Para fazer o descanso-de-panela e os descansos-de-copos cortar o tecido neutro utilizando o esquema 2 de corte depois repetir os passos 10 a 14. Você poderá variar a decoração dos mesmos substituindo a rebatida da costura em volta por algum desenho quiltado ou mesmo uma aplicação central (com papel termo-colante) e caseada depois.
http://ro-aguiar.blogspot.com.br/2012/05/mesa-bem-vestida-economia-e-bom-gosto.html
MESA BEM VESTIDA - ECONOMIA E BOM GOSTO
Bom dia, meninas, final de semana chegou e com ele a alegria de ter toda a família reunida em casa para as refeições. Tudo de bom!
Pensando nisso, proponho como projeto da semana um conjunto de jogo-americano para o lanche do pessoal, com uma medida um pouco menor que o padrão pois eles serão utilizados apenas com pratos de sobremesa. Além disso, com esse projeto você poderá coordenar as peças entre si e criar várias composições para sua mesa, variando a arrumação no dia-a-dia, poupando não só o bolso mas o espaço nas gavetas da cozinha.
Para quem gosta de patchwork, de casa bonita e principalmente de economia, saiba que com pouco dinheiro, cálculo preciso e capricho você consegue fazer muito facilmente uma roupa de mesa perfeita para aquele lanchinho com a família ou com as amigas.
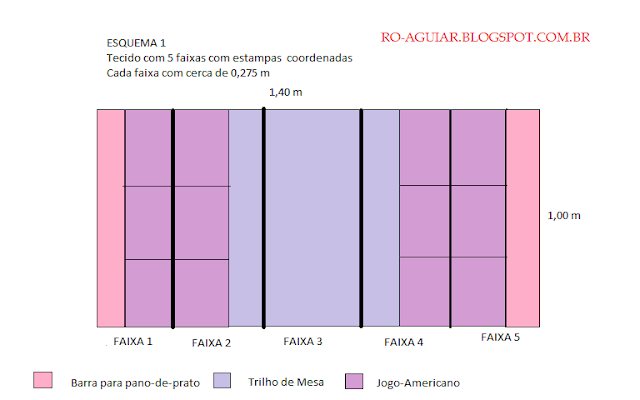
Vamos lá! A dica nesse caso é a escolha do tecido que será usado. É nisso que consiste toda a economia (financeira e de trabalho) do projeto. Você já deve conhecer aqueles tecidos que possuem faixas com diferentes estampas coordenadas entre si num mesmo corte. É esse tipo de tecido que vamos utilizar, o meu tem 5 faixas cada uma com cerca de 27,5 cm ( tecido nacional - largura 1,40m ). O pulo-do-gato está no esquema de corte.
Acredite, com apenas 1 metro desse tecido mais 0,80cm de um tecido neutro para o forro, você fará 6 jogos-americanos dupla face, 1 trilho de mesa , 1 descanso-de-panela, 6 descansos-de-copo mais o pano-de-prato (com aplicação-opcional).
Seguem os esquemas de corte. O esquema 1 refere-se ao tecido de faixas e o esquema 2 ao tecido neutro. Atenção ao corte do esquema 1 pois o tecido terá que ser dobrado ao meio conforme explicado no passo-a-passo.
As medidas abaixo já estão com margem de costura de 1cm .
6 Jogos-Americanos - 0,40 X 0,33 m cada - 12 pçs ( 6 frente-estampado e 6 verso-neutro)
6 Descansos-de-copos - 0,14 X 0,14 m cada - 12 pçs ( frente e verso - neutro)
1 Descanso-de-panela - 0,18 X 0,18 m - 02 pçs ( frente e verso - neutro)
1 Trilho de Mesa - 1,40 X 0,425 m - 01 pç ( frente-estampado)
MATERIAL
1 metro de tecido com 5 faixas coordenadas - cada faixa com cerca de 27,5cm
0,80 m de tecido neutro que combine com as estampas das faixas
0,80 m de manta acrílica
material básico de costura (tesoura, agulha, linha, régua, máquina, etc)
material básico de costura (tesoura, agulha, linha, régua, máquina, etc)
pano-de-prato (opcional)
papel termo-colante para aplicação (opcional)
papel termo-colante para aplicação (opcional)
PASSO - A - PASSO
*atenção o descanso-de-panela teve o tamanho alterado para 18 x 18cm para otimização do corte*
Para fazer o descanso-de-panela e os descansos-de-copos cortar o tecido neutro utilizando o esquema 2 de corte depois repetir os passos 10 a 14. Você poderá variar a decoração dos mesmos substituindo a rebatida da costura em volta por algum desenho quiltado ou mesmo uma aplicação central (com papel termo-colante) e caseada depois.
Para o pano-de-prato há material para 2 barras pois os panos de sacaria normalmente têm entre 44 e 50cm de largura, como teremos 1 metro de faixa temos a opção de prepararmos 2 panos.
Também podemos optar por fazer apenas um, bem caprichado como o da foto ao lado, usando as sobras dos dois padrões de tecido para as aplicações.
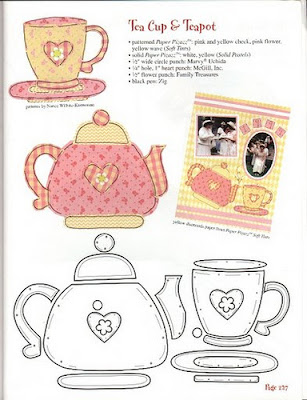
Deixo alguns riscos que podem ser usados com o tema em questão.
sexta-feira, 1 de novembro de 2013
Necessaire porta-bijoux
Olhem que achado esse projeto....
simples mas que faz uma falta.... aproveitem.
o endereço é http://networkedblogs.com/rwqpc

simples mas que faz uma falta.... aproveitem.
o endereço é http://networkedblogs.com/rwqpc

sexta-feira, 25 de outubro de 2013
quinta-feira, 24 de outubro de 2013
Encapando cadernos, ficharios, etc....
Estou pesquisando projetos para encapar cadernos, agendas, ficharios, etc.... e, vou postando aqui o que encontrar de lindo pela net para dividir com voces.....
Vamos ao primeiro:
Composition Notebook Covers
Voces encontram o tutorial aqui: http://bloominworkshop.wordpress.com/2011/08/16/composition-notebook-covers/
Composition Notebook Covers
Voces encontram o tutorial aqui: http://bloominworkshop.wordpress.com/2011/08/16/composition-notebook-covers/
terça-feira, 22 de outubro de 2013
Para o Dia das Bruxas... Pumpkin pincushion
Olhem que coisa mais fofa.... do site www.sewwequilt.com
Fabric requirement
1/4 yard for your pumpkin pieces
10 inches x 2 inch for your stem, alternate colour...brown, black, green...whatever..
rice about 1/4 cup
fiberfill ( stuffing) about a handfull
Presencia thread
Aurifil thread

Pumpkin Patch Pin Cushion Tutorial. ( lots and lots of photos)
It is for those who want to make it exactly like this… And yes it is easy- one very simple pattern piece, but here is where this pattern will be different than many others you have purchased. I show you every step, every detail, every trick, every hint, nothing held back.
I even tell you where to get your needles, threads.... In fact for future ideas especially pin cushions or DOOR STOPPERs ( new year blog hop) YOU will be successful in your creative zen. If you choose any of these pumpkins in the pumpkin patch , I swear yours will look the same if you follow all the photos and purchase the same material or similar..or my name is not Mdm Samm!
Ok, are you ready to make a very simple
PUMPKIN PIN CUSHION?
PUMPKIN PIN CUSHION?
Fabric requirement
1/4 yard for your pumpkin pieces
10 inches x 2 inch for your stem, alternate colour...brown, black, green...whatever..
rice about 1/4 cup
fiberfill ( stuffing) about a handfull
Presencia thread
Aurifil thread
( pattern is at the bottom of this post)
Now why place your pattern piece towards the selvage edge...?
Quilting Fabrics have more stretch ( crosswise grain) and less ( lenghtwise grain)
YOU want it to stretch from the top to the bottom of your pumpkin...( crosswise grain)
If you are not sure which is which...TRY this stretch test...
YOU want your stretch of fabric to go from the top of pumpkin to the bottom,
not across, otherwise your shape will not be pumpkin like.. Make sense?
I tripled my fabric, pinned and cut and repeated again with 4 pieces of fabric...
YOU need 7 individual pieces...
Use a hot dry iron so it does not stretch your fabric.
I love love love my Reliable Sensor iron...most dependable iron that I have ever used...
Sew one at a time until all of them have been stitched, when you get to the last one...
#7 leave 2 inches open from the top and backstitch where you place your last stitch...
Here is what you will need....NOT all that rice or stuffing goes into that pin cushion..
this day I was making 5 of them....The bowl with rice in it, makes it easier for clean up...
The black piece of fabric there is for your stem...more on that below..

I love Aurifil thread for many reasons, our machines love it, it is very thin, so you don't see the stitches
and it holds up like no other on the market... Ohhh and those wee Dovo scissors my favourite
scissors in the whole wide world...YOU can find them here at Anita's online store..
she has a wide variety. These are the 3 1/2 size..perfect for hand sewing and cutting....
Take your 10 inch piece and roll like a pipe...trim off end pieces when completed stitching...
it will fray and that will look just fine.... now put that stem aside for now....
Turn your pumpkin right side out.. and place pumpkin shell in your rice bowl...
I used a small teaspoon to pour into opening...
Leave enough room for some stuffing...this will just look better and the pins will stay in
your pin cushion...
I chose some Orange Aurifil thread and stitched close to the edge seam...in and out...
not over the top stitching...
See how my stitching is close to the edge and almost invisible...
now Place your stem inside, push in about 1/2 inch...
Now stitch right through stem to other side of pumpkin shell...
Piecemakers needles are perfect for any stitching where you need a longer
needle...they are sharp and ideal for making dolls ( for future -blog hop
use when adding head and limbs
to your doll)
in this case....perfect for squeezing pumpkin together to give a full look...
I use Presencia thread #8 for the thread to squeeze the pumpkin from top to bottom..
That bubble gum casing is just great to keep your thread together...
Those you can find anywhere...
Double your thread and begin at the bottom and knot there, then insert needle towards
the top and thread and pull each time to bring it all in....I do this 3 x ...
YOU have completed your pumpkin when you knotted your theads on the top and bury
it is closest to the stem...
For A large variety of theme buttons, you can go to SHELLY BUTTONS AND MORE...
she has allllll of these buttons and so much more...
And how to make these
ALSO FREE and loads of links to purchase supplies...
I just turned the pattern this way so you could see it...you can copy this and print
and it should print 5.5 in length and 2 inches wide.
Nobody ever achieves any success without others. So to Reliable a Reliable Sensor Iron,
Shellys Buttons and More for Buttons, Anita at Anita little stitches for Dovo Scissors,
Colonial Needle for Presencia Threads and Aurifil for their BEST in threads... PieceMakers doll Needles, Thank you for creating and providing such terrific sewing and quilting tools.
Ohhh this gingham fabric was from a collection Now we are going Places...by Monica Lee
who has retired from fabric making....sadly too...she was really good!
The top gingham pumpkin is no other than Riley Blake Designs gingham ( 1/2 inch)
LOVE love love their ginghams!
The top gingham pumpkin is no other than Riley Blake Designs gingham ( 1/2 inch)
LOVE love love their ginghams!
By the way this simple pumpkin patch pin cushion pattern, took me ONLY 1 week to create, 63 23 hours ( thanks to TJ for the note) to take photos, edit, and write...simple YOU BET ...wink! ( been up far too many hours)
Still in exams this week!
See you soon at Wicked....!
Still in exams this week!
See you soon at Wicked....!
ohhh happy thanksgiving
I am so thankful for caring, sharing, thoughtful friends!
REALLY those who love to sew and quilt
are soooo darn sweet and generous too..
I am so thankful for caring, sharing, thoughtful friends!
REALLY those who love to sew and quilt
are soooo darn sweet and generous too..
ps. Yesterday upon completing another exam...this came in my inbox...
If you believe I am a good contributor for BEST in PHOTOGRAPHY-Quilting...
by all means go to the link and vote....
WE all win of course....
I am thrilled to be with so many pretty amazing ladies.....
Assinar:
Postagens (Atom)


