Páginas

sexta-feira, 3 de maio de 2013

Poncho doce infancia

PONCHO TRICOTADO


Você sabe tricotar? Estes passos irão lhe ensinar os segredos para confeccionar um poncho para meninas numa única tarde. É bem fácil de fazer é tricotado exclusivamente com ponto malha.
Voce precisa de
Par de agulhas n.° 9
Lã na cor violeta, 100 g
Lã fantasia cor-de-rosa, 100 g
Lã na cor manteiga, 120 g
Passos


Parte dianteira: tricote 34 pontos com a lã na cor violeta. Tricote em ponto malha (uma fileira de pontos em meia e uma fileira de pontos em tricô) até obter 10 cm de altura.


Troque a lã pela lã fantasia cor-de-rosa. Continue tricotando mais quatro fileiras em ponto malha.


Na fileira seguinte de pontos em meia, comece a executar as diminuições em ambas as extremidades, da forma a seguir:
A) um ponto de borda, uma diminuição (dois pontos em meia juntos), tricote em ponto meia até que fiquem três pontos na agulha esquerda, faça uma diminuição (passe um ponto sem tricotar, tricote o ponto seguinte em meia, monte neste último o ponto anterior) e um ponto de borda.
B) Tricote a fileira seguinte em ponto tricô.
Continue tricotando estas duas últimas fileiras A e B para dar forma ao poncho.


Ao atingir os 10 cm de altura tricotados em lã fantasia, troque esta pela lã na corde manteiga. Continue tricotando e aplicando as diminuições em ambas as extremidades A e B até ficar com dezesseis pontos na agulha.


Com estes dezesseis pontos, tricote 6 cm em ponto elástico 1/1 (um ponto direito e um ponto avesso). Na fileira seguinte, tricote conforme apresentado. Corte o fio.

6

Tricote a parte das costas da mesma forma que a parte da frente.
Montagem: costure as partes da frente e das costas por ambas as laterais

Gorro e cachecol los andes


Gorro e cachecol com los Andes


Gorro (adulto):

Agulhas nº 8 (retas ou circular)
Fio Los Andes (Aslan)


Montar 48 pontos mais um ponto em cada borda.
Tecer 6 carreira em cordões de tricot e 8 carreiras meia no direito e tricot no avesso
Aos 15 cm iniciar as diminuições que acontecem a cada 2 carreiras:
- 1 ponto borda, cada 8 pontos fazer dois juntos em meia pelo direito. 1 ponto de borda;
1 ponto borda, cada 6 pontos fazer dois juntos em meia pelo direito. 1 ponto de borda;- 1 ponto borda, cada 4 pontos fazer dois juntos em meia pelo direito. 1 ponto de borda;- 1 ponto borda, cada 2 pontos fazer dois juntos em meia pelo direito. 1 ponto de borda;passar o fio pelos pontos dar um nó e prender firme, costurar a lateral.

Cachecol fininho (que enrola):


Agulhas nº 8 para o fio Los Andes (Aslan) e agulhas nº 4,5 para o fio Premium (Cisne)

Monte 14 pontos com o fio Los Andes em agulha nº8 e tricote por 8 cm.

Mude o fio e a agulha e continue por 115cm tecendo em meia no direito e tricot no avesso.

Retome a agulha 8 e o fio Los Andes e teça em tricot por mais 8 cm.

Arremate.
 
fonte http://tricoteirassemfronteiras.blogspot.com.br 

The octagon tote

Uma nova visão para um antigo bloco.....

***

New Life for Old Quilt Blocks: The Octagon Tote

VQB-tote-finished3

Hi, everyone! It's so cool to be hanging out with you today on one of my very favorite blogs. I'll try to do justice to Michele's recycling genius by sharing one of my favorite upcycled sewing projects ever.

VQB-tote-blocks

The whole thing started when I found a stack of quilt blocks at a thrift shop – the product of someone having taken a seam ripper to a pretty groovy old pinwheel quilt. These blocks were full of nifty vintage fabrics, sun-faded to the prettiest mellow colors. I snapped them up with grand plans to return them to quilt form.

Well… rookie mistake. I didn't notice until I got them home, but many of the blocks had been torn right along the seam line when they were taken apart. So, I couldn't simply sew them back together. Then I thought I'd just cut them down to a smaller size and add some sashing. That's when I discovered that the piecing was just inconsistent enough that cutting the blocks down only made them look very wonky. 

Sigh. I put the whole mess in my stash. Four years went by. You know how that goes.

VQB-tote-patches

Anyway, during that time, I got interested in English paper piecing, which you've seen in action with Michele's beautiful hexie quilt. It finally occurred to me that maybe I could use this technique with my blocks. Since the pinwheel design of the block has eight sections, I thought an octagon shape might just fit the bill.

VQB-tote-finished2

And you know what? It did! So here's how I rescued my quilt blocks and turned them into two pretty tote bags (and enough left over for coasters).


VQB-Diagram

The Plan

I didn't get too crazy with the measuring when I designed my tote. I knew I could get octagons measuring 4 ¼" across out of my quilt blocks, so I worked from that. 

I decided that nine octagons this size would make a reasonable-sized tote panel, and I decided that, once I'd pieced together the octagon parts, I'd add some strips of solid fabric around the edges. So I used ¾ yard of solid to flesh out the rest of the tote's outside, and ¾ yard of a thrift-store sheet I had in stash for lining.

My finished totes measure 15" x 15", with 25" long handles. But the beauty of this kind of project is that you can end up with any size and shape you like.

VQB-tote-supplies

Part 1: Make the Octagon Patches

If you've never English paper pieced before, there are so many good tutorials online. My all-time favorite is this one from Sunshine's Creations

I used freezer paper to make my octagons because I wanted to be very sure the paper wouldn't move while I was basting the fabric to it. So I drew an octagon using a drawing program on my computer (Google Drive's Drawing tool is a dandy free option). I printed two of them onto card stock, cut them out, and cut one of them precisely in half. (I'll explain why in a moment.)

VQB-tote-tracing

Then I traced the octagon onto the dull side of the freezer paper 18 times (I needed nine octagons for each side of my tote). I used that half-octagon to trace myself some registration lines across the middle of each octagon in both directions. Then I carefully cut them all out.

VQB-Composite-1-2

Next, I placed the freezer paper over the wrong side of the fabric, shiny side down, and I used those registration lines to match up with the seams in the quilt block. (Not every block was a perfect match, but those lines helped me get very close.) I pressed the paper with a hot iron, which lightly fused it to the back of the block. Now I was ready to baste!

VQB-tote-3

From this point, making octagons is a lot like making hexagons. I trimmed the quilt block to a generous 3/8" outside the edges of the paper. Then I threaded a needle with some contrasting thread, so my basting stitches would be easy to see and remove later.

VQB-Composite-5-6

Here's how I baste a patch this size: I start by taking a large-ish stitch in the middle of one side, sewing through both the paper and fabric. Then, I fold the next side down over that one, and I take a little tack stitch, just through the fabric at the fold point. I alternate those two stitches as I make my way around the octagon.

VQB-tote-8

When I get back to where I started, I leave a couple inches of thread hanging from my last stitch, but I don't tie a knot. Your basting will stay in place just fine with this method, and be much easier to remove later. (You can see this whole process in action in this video of mine.)

VQB-tote-13

Part 2: Making Square and Triangle Patches

Unlike hexies, octagons don't fit perfectly together – they leave little square spaces in between! So I cut some more card stock shapes to fill in those spots. For each side of my tote, I needed nine 1 ¾" squares. Four of them I left as-is. I cut four more in half on the diagonal, making eight triangles. And to fill in the very corners, I cut one last square into quarters on both diagonals.

VQB-Composite-9-12

I basted my solid fabric to these shapes. To do this basting, you can either pin or lightly glue the card stock to the wrong side of the fabric. (Have you ever tried using glue stick for English paper piecing? Hoo, boy is it dandy. You just use a tiny dash, so it doesn't damage the fabric at all. And you never get stuck by pins!)

Anyway. I basted these patches through both the card stock and fabric, just using large stitches to hold down the points where I folded one side over the other. Since the pieces are so small, you won't need more than one stitch at each edge.

VQB-tote-16

Part 3: Sewing Stuff Together

The thing I love about English paper piecing is that you can sew a whole bunch of shapes together like this, and get very precise corners with little effort. Here, I sewed my octagons and squares together first, and then added the triangles at the sides and corners.

VQB-Composite-14-15

I like to sew my patches together with a whip stitch. It's just a matter of lining up the edges you want to sew together (right sides facing), making sure their end points match up. Then, take very tiny stitches; just a few threads from the edge of each patch. Make sure you sew all the way from one end to the other – don't leave any gaps at the ends! (Sunshine's tutorial covers the basics of whip stitch nicely.)

If your stitches are tiny, then you won't see them at all on the right side of the fabric. If you areseeing stitches on the right side, try a smaller needle and smaller stitches.

VQB-tote-17

Part 4: Finishing

Once I'd sewn all my patchwork together, it formed two big blocks. I gave each one a good pressing – papers and all. I pressed a whole lot around the outer edges of the blocks, because I knew I'd need sharp creases there (more on that in a moment).

Then, I carefully removed all the basting stitches and papers. That's my favorite part of English paper piecing, incidentally – when this stiff, crackly thing transforms into beautiful flowing patchwork.

VQB-Composite-18-19

Now, in order to sew anything accurately to these patchwork blocks, I needed to square them. Here's where I used those sharp creases I was pressing around the outer edges. 

I carefully opened out the folds along one edge of the patchwork, but I didn't press them. The crease that runs along this edge is my seam line, and I need an accurate ¼" seam allowance extending from that.

So, I used a ¼" line on my quilting ruler and lined it up with the crease, making sure it lined up both at the top and bottom of the block. (This being hand sewing, there are always a couple places where the alignment's slightly off, but you can aim for the closest possible overall alignment and it'll work just fine.) When I had the whole edge lining up with that ¼" line, I used a rotary cutter to trim away any excess fabric bits. Then I pressed the edge out flat before sewing. I did the same thing on all four edges of my blocks.

VQB-tote-20

From there, I machine-sewed solid strips to to all four edges of the patchwork. I used 3" wide strips at the bottom and sides, and a 1 ½" wide strip at the top. (That extra width at the bottom and sides allows the tote to have some depth while keeping the patchwork centered on each side.) I made two panels like this; one for the tote front and one for the back.

VQB-tote-21

…And then I gave the panels a bit of reinforcement. Let's face it, vintage quilt blocks are somewhat delicate, so I didn't want any of those old seams carrying the weight of my library books and farmer's market produce!

I cut two pieces of lightweight canvas the same size as the tote panels, and then pinned one to the wrong side of each panel. I used a walking foot on my sewing machine to stitch some simple quilting lines over the surface to hold the layers together.

From there, I used my favorite-ever tote tutorial from Skip to My Lou to make up the rest of the bag.

VQB-Composite-finished

***
You see that? It was wise to keep those old quilt blocks around for all those years after all. I just love that she's repurposed them into these extra pretty patchwork totes. It is such a great way to highlight their simple beauty. Note to self: Keep eyes peeled for yummy old quilt blocks.

fonte: http://www.michelemademe.com/ 

Faux Quilting

Que linda ideia de reciclagem.....


recycled crafts faux quilted bulletin board19
The husband works for a company that gets large parts in daily and they are packaged with styrofoam around them for protection.  So, of course I confiscated some.  I am a huge fan of creating crafts from recycled materials.  I decided to create a bulletin board that gives the look of quilting, but is actually incredibly easy to do.  It is a colorful addition to my sewing room!  Want to know how to make your own?

For this project I used:

One sheet of styrofoam packing material (36″ x 12″ x 1/2″) If you do not have access to packing material, your local craft store sells it in similar size sheets.
*Assorted fabrics, cut in strips for easy handling
free house quilt pattern
Ruler
Sharpie Pen
Craft Knife
Butter knife or credit card for pushing fabric into the styrofoam
Sheet of foam board
Thumb tacks
*If you would like the same print selection, I used the jelly roll selection called “Mardi Gras” from Discount Sewing Supply, along with some creme colored fabric from my stash.  Discount Sewing Supply is offering a 5% discount off the Mardi Gras jelly roll exclusively for Sitcom readers.  Just enter the coupon code SSBB1301 at the end of the checkout process.  Free shipping on all their jelly rolls!  (This is not a sponsored post- I just love their fabrics!)
recycled crafts faux quilted bulletin boardrecycled crafts faux quilted bulletin board1
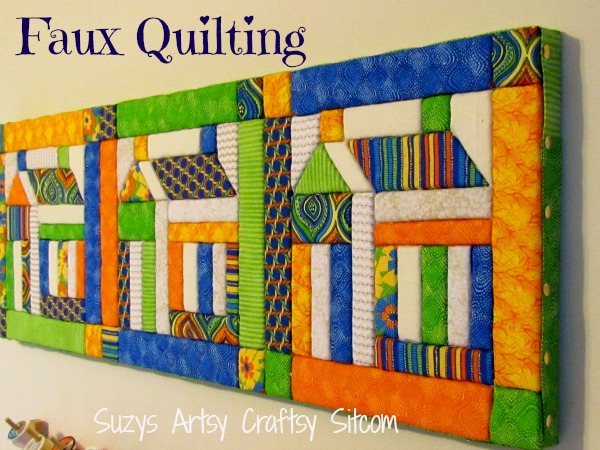
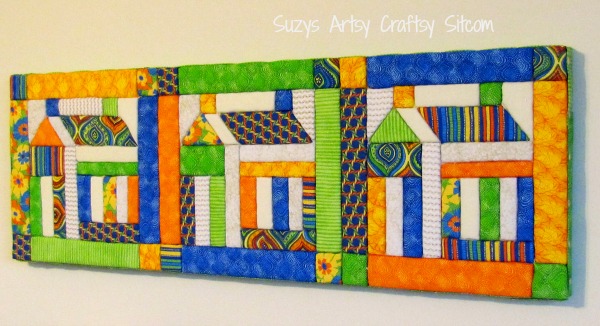
My pattern is a 12″ square, so I was able to make three repeats of it across the width of the styrofoam sheet.  I used a pencil and ruler to mark it out, and then used a sharpie pen to darken the lines.
recycled crafts faux quilted bulletin board2recycled crafts faux quilted bulletin board4
Once the pattern is complete, I chose a variety of fabrics to use.  My original plan was to go with a wintery look, but after searching through my fabric stash, I was drawn to the warm summery colors.  I chose about 8 different coordinating fabrics, and then cut them in 2- 1/2″ wide strips for easier handling.
recycled crafts faux quilted bulletin board6recycled crafts faux quilted bulletin board7
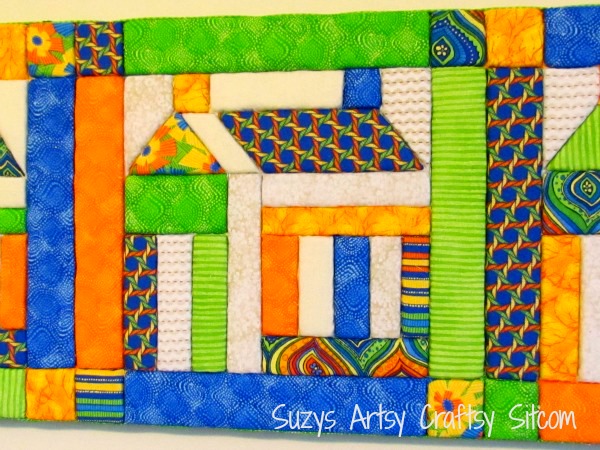
Choose a place to begin and cut a piece of fabric big enough to overlap all four sides of the area by about 1/2″.  Use the craft knife to cut into the styrofoam along the line.  Be careful not to cut entirely through the styrofoam sheet.  You want to go about half way through.
recycled crafts faux quilted bulletin board8recycled crafts faux quilted bulletin board9
Use a butter knife or credit card to push the edges of the fabric down into the styrofoam along the cut lines.
recycled crafts faux quilted bulletin board10
Choose your fabrics as you go and repeat the above steps, pushing the extra fabric into the cracks.
recycled crafts faux quilted bulletin board12recycled crafts faux quilted bulletin board11
On the edges, simply overlap the fabric over the edge and push into the crevices made by your craft knife.
recycled crafts faux quilted bulletin board13recycled crafts faux quilted bulletin board14
Because the sheet of styrofoam has been compromised, it is a bit weak.  To ensure that it does not break, cut a piece of foam board big enough to glue to the back of the styrofoam using low temp hot glue.  Cut strips of fabric about 2- 1/2″ wide to use as the edging fabric.  Use the low temp hot glue gun to glue the strip along the edges of the back.
recycled crafts faux quilted bulletin board15recycled crafts faux quilted bulletin board16
Fold the strip of fabric over the side of the project, fold the edge where it meets the front, and press in place with a thumbtack.  If your thumbtack will not stay in place, use a dot of hot glue on the tip of it before you punch it in.
recycled crafts faux quilted bulletin board18
And there you have it.  A sunny, colorful bulletin board with the look of a fancy quilt.  A perfect decoration for my sewing room.
recycled crafts faux quilted bulletin board17
Do you like recycled craft projects?  Then be sure to check out the following!
fonte: http://suzyssitcom.com

quinta-feira, 2 de maio de 2013